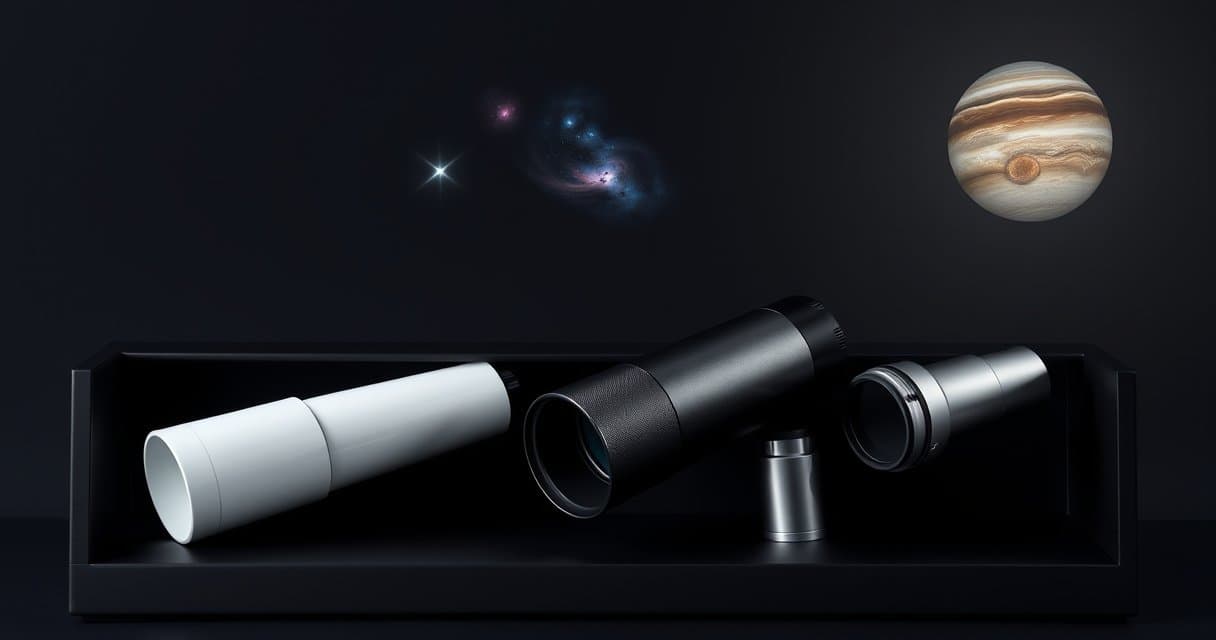
Astrophotography Telescope Buying Guide
Guide
Frankly, capturing the beauty of a nebula with your own telescope is a magical experience, but it is also a path full of technical challenges. The pitfall is believing that any instrument is sufficient for astrophotography. In reality, your choice will determine whether you spend nights in frustration or in pure wonder. Let's discuss bluntly what really matters to make the right purchase and turn your nights into successes.
Key Points to Remember
- Telescope choice is dictated by the target: a short focal ratio (f/4-f/7) for deep sky, a long focal length (f/10+) for planetary.
- A robust and precisely motorized mount is more critical than the tube for success in astrophotography.
- The optical type defines character and limits: APO refractors for contrast, Newtonians for affordable aperture, catadioptrics for compact versatility.
- For deep sky, a guiding system and accessories like filters or a focal reducer make the difference between frustration and success.
- It is essential to progress step by step by first investing in a good mount, rather than seeking a costly and complex all-in-one setup from the start.
Define Your Targets: Deep Sky or Planetary?
This is the fundamental question, the one that guides everything else. If you don't ask it from the start, you risk ending up with unsuitable equipment, and frankly, that's a sure path to frustration. You don't hunt hares with a sniper rifle, nor pheasants with a cannon. It's the same here. Your decision splits the world of astrophotography into two universes with radically opposite needs.
For Nebula and Galaxy Hunters (Deep Sky)
Your playground consists of faint and often large objects. We're talking about the Orion Nebula (M42), the Andromeda Galaxy (M31), or vast star clusters. Their light is faint, drowned in light pollution. Your goal: capture as many photons as possible.
For that, aperture is king. Absolute priority to a generous diameter (150mm minimum, ideally more) to collect light like a sponge. Then, you need a short focal ratio (between f/4 and f/7). Why? Because a low F/D ratio gives you a wider field of view and, crucially, a shorter exposure time for each image. This is vital. You will spend your nights stacking exposures of several minutes.
The mount here is not an accessory; it's half of your instrument. It must be extremely robust, motorized, and precise to track the Earth's rotation to within arcseconds during these long minutes. It's technical, demanding, but the results can literally take your breath away.
For Observers of Moons and Atmospheres (Planetary/Lunar)
This is a completely different sport. Your targets – Jupiter, Saturn, the Moon – are bright and small. Their light is not the problem. The challenge is resolution, the sharpness of details: Jupiter's bands, Saturn's rings, lunar craters.
Here, it's focal length that rules. You need a telescope with a long focal length, which translates to a high focal ratio (f/10, f/15, or more). This allows for high magnification on your camera's sensor. A large aperture is still beneficial for finer details, but a well-used 100mm tube can already produce extraordinary images.
The good news? The demands on the mount are less tyrannical. A simple equatorial mount or even a good motorized altazimuth mount can suffice, because your exposures will be very short (a few seconds, or less). The preferred technique is "lucky imaging": you film thousands of images to select the best ones, frozen by stable atmosphere.
The Thorny Choice: Does Versatility Exist?
We often want an instrument that does everything. Let's be clear: a truly 100% versatile best astrophotography telescope is a myth, or else it costs a fortune and requires real know-how. A Schmidt-Cassegrain (f/10) can be an interesting compromise: with a focal reducer, it approaches deep sky; with a Barlow lens, it specializes in planetary. But it's a compromise, with the advantages and disadvantages that implies – often a bit heavier, a bit more complex. If your heart is truly torn, this might be the path to consider, knowing that you will likely need to invest in accessories to cover all cases.
Advantages and Limitations of the Three Optical Families
Once you know what you want to photograph, you need to look under the hood. The optical type of your tube defines its character, its strengths, and above all, its weaknesses. Don't just rely on price or design; each family has a distinct personality that will influence your nights, and your back.
Refractors (lens-based): The Aristocrats of Contrast
Imagine a long, thin tube, straight as an I. That's a refractor. Light travels in a straight line through lenses to reach your sensor. Their main advantage? A simple, sealed mechanical design that requires little maintenance. No mirror to collimate, no issues with dust. And above all, they offer exceptional contrast and very sharp images right from the start.
For astrophotography, we only talk about apochromatic (APO) models, which correct chromatic aberrations (those unsightly colored fringes) almost perfectly. An 80mm f/6 APO is a true deep-sky machine, lightweight and portable. The catch? For an equal aperture, they are significantly more expensive than other types. A good 100mm APO can cost more than a 200mm Newton. They are also physically longer for a given focal length. This is the choice of the perfectionist who prioritizes raw image quality and simplicity of use, especially for wide fields.
Newtonian Reflectors (mirror-based): The Champions of Performance/Price Ratio
Here, we enter the big leagues. A Newton uses a concave primary mirror at the bottom of the tube and a small secondary mirror to redirect the light to the side. Its major asset? For a given budget, you get a much larger aperture. Want a 200mm diameter to capture loads of light without breaking the bank? The Newton is often your only realistic option.
Models dedicated to photography, called astrographs, are often optimized with a very short focal ratio (f/4 or f/5) and a robust focuser. It's the ultimate weapon for the nebula hunter. But nothing is perfect. A Newton requires space (the tube is bulky). And it requires regular collimation – the precise alignment of the mirrors – a small routine operation that seems daunting at first but quickly becomes a formality with a little practice. If your budget is tight but your ambitions for deep sky are big, it's a royal path.
Catadioptrics (mixed): The Compact All-rounders
Schmidt-Cassegrain (SC) and Maksutov-Cassegrain (Mak) telescopes fold the optical path using a system of mirrors and a corrector plate at the front. Result: an ultra-compact tube for a very significant long focal length. A 200mm diameter SC fits in a backpack, whereas an equivalent Newton would be as cumbersome as a sofa.
This native long focal length makes them instruments naturally suited for planetary and small deep-sky objects (like planetary nebulae). They are very versatile. But their focal ratio is often high (f/10), making them less "fast" for large nebulae. You then need to add a focal reducer, an additional accessory. Another point: they take some time to reach thermal stability after being taken outside. This is the perfect choice for someone who wants a single instrument to do everything, observation and photography, especially if they need to transport it often, but accepting the need to juggle accessories to cover all scenarios.
Our Selection
Navigating the world of telescopes can be confusing, between traditional visual astronomy and accessible astrophotography. We have analyzed three products with radically different approaches: an all-in-one smart telescope, a classic entry-level instrument, and a guide to accompany you in your practice. Our goal is to decipher, through technical specifications and community feedback, what each one truly offers.
To compare these heterogeneous offerings, here is an overview of their main characteristics:
| Product | Device Type | Diameter (Aperture) | Mount & Major Strength | Level of Automation |
|---|---|---|---|---|
| ZWO Seestar S50 | Smart telescope (refractor) | 50 mm | Motorized Altazimuth; Automated Imaging | Very High (GoTo, autofocus, stacking) |
| SOLOMARK 130EQ | Traditional Newtonian telescope | 130 mm | Manual Equatorial (EQ-3); Generous Aperture | Very Low (manual) |
| Dwarf 3 | Educational guide (not a telescope) | - | - ; Step-by-step learning | - |
ZWO Seestar S50
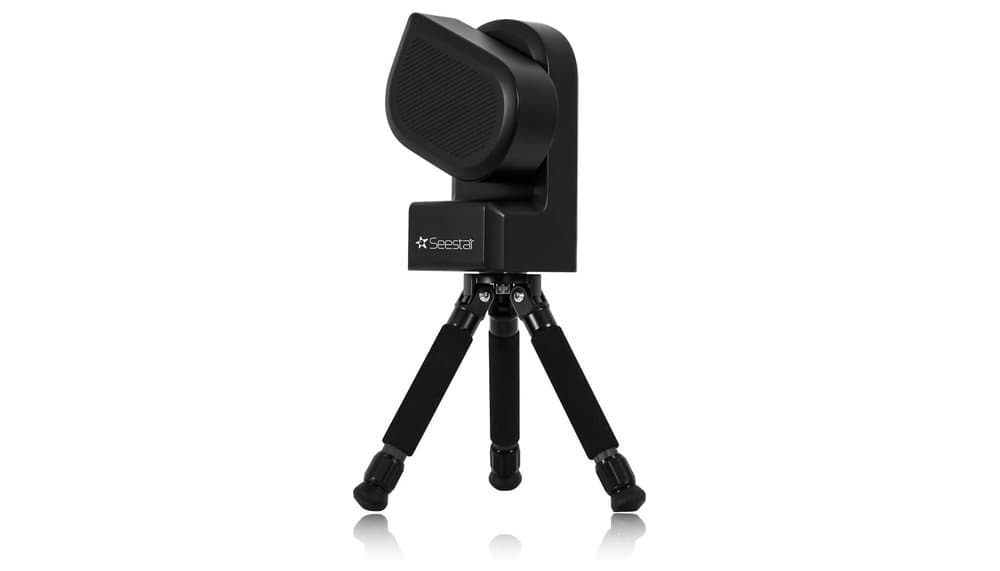
The Seestar S50 represents a category apart: that of all-in-one smart telescopes. On paper, its specs set the tone: a 50mm apochromatic lens designed to limit chromatic aberrations, an integrated altazimuth mount with GoTo system (automatic pointing), and 6 hours of autonomy on an internal battery. Its great advantage lies in its software integration: the dedicated application manages pointing, automatic focusing, and live stacking – a technique that superimposes images in real time to gradually reveal details of deep-sky objects.
According to user feedback, it's precisely this simplicity that appeals. Beginners in astrophotography, often discouraged by the technical complexity of a traditional setup, highlight the possibility of producing quality images of nebulae or galaxies in just a few clicks, without prior knowledge of optics or mounting. The community also notes its great portability (3 kg) and quick setup time.
However, the analysis of reviews also reveals concrete limitations. The 50 mm aperture is modest, meaning it captures less light than a telescope with a larger diameter. Purists of visual observation might be frustrated by the experience, which is entirely conducted through the screen of a smartphone or tablet, without the possibility of looking directly through an eyepiece. Furthermore, some experienced users mention that, despite its impressive performance for its category, it quickly reaches its limits in terms of level of detail compared to a dedicated and more open photo setup. Finally, it is a closed ecosystem: you are entirely dependent on the ZWO application and firmware, with little possibility for modification or addition of external accessories.
SOLOMARK 130EQ
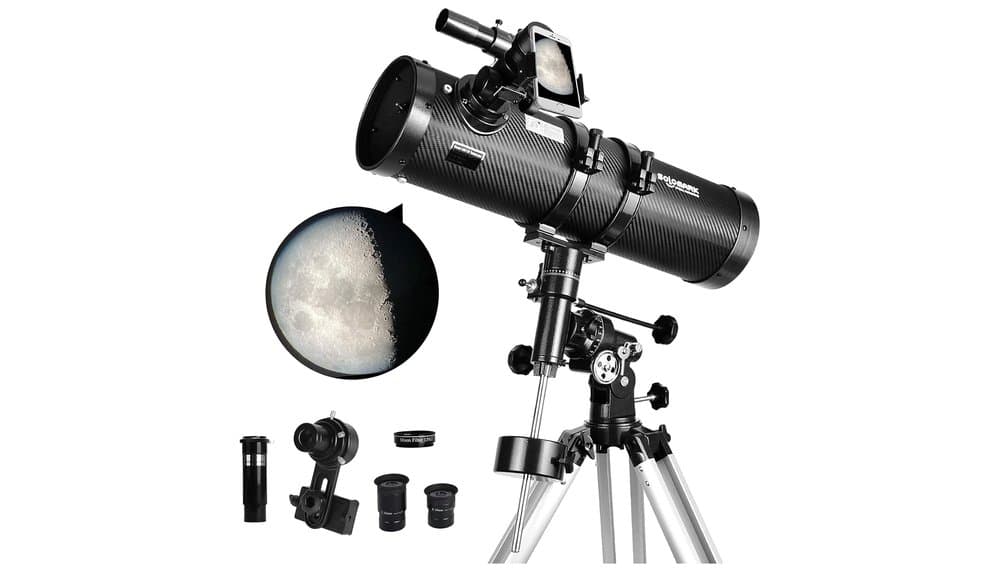
The SOLOMARK 130EQ embodies the classic, manual approach to amateur astronomy. Its technical specifications revolve around a major selling point: a 130 mm aperture. This large-diameter primary mirror allows it to collect much more light than a smaller instrument, which translates, in theory, to brighter images and the ability to distinguish fainter celestial objects. It comes with an EQ-3 type equatorial mount, designed to manually track the rotation of the stars once properly aligned.
Community reviews, particularly those from beginner astronomers seeking a first "hands-on" experience, highlight its excellent price-to-performance ratio for the aperture offered. The inclusion of a smartphone adapter and a 1.5x Barlow lens is also appreciated for attempting first photos of the Moon. For many, it is an ideal stepping stone to understanding the mechanical basics of a Newtonian telescope and the operation of an equatorial mount.
But these same reviews paint a realistic picture of the challenges. The equatorial mount, although precise in theory, is described as light and sometimes unstable for the 650 mm focal length tube, making manual tracking delicate and sensitive to vibrations. Learning its alignment (on the pole star) and operation is a necessary and significant step. The secondary mirror and its support (the "spider") obstruct some incoming light, and the optics require regular collimation (mirror alignment) to perform at its best, an operation that can be intimidating. Finally, its size and weight (nearly 15 kg when packed) make it a not very portable instrument, contrary to its "portable" description.
Dwarf 3
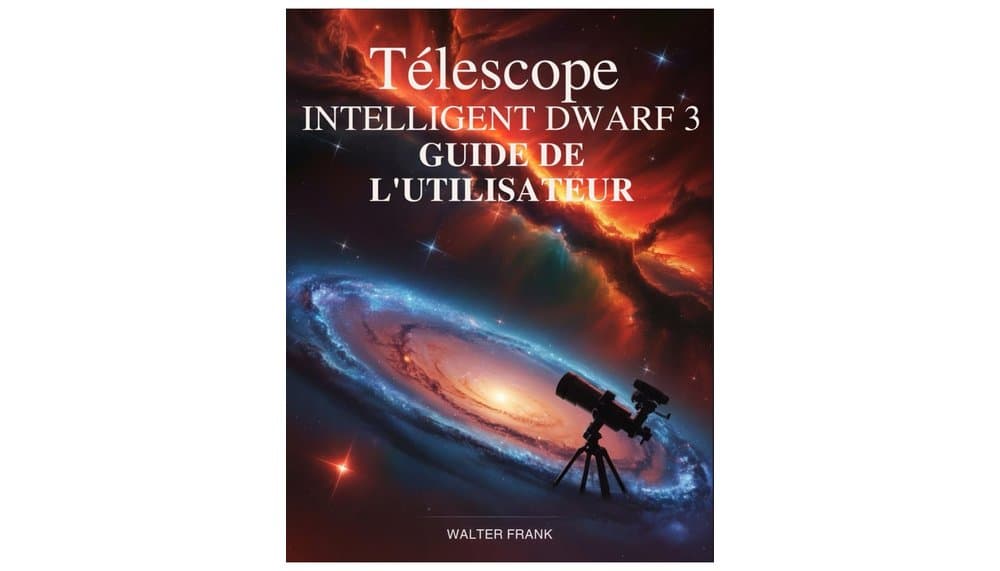
It is crucial to clarify from the outset that the Dwarf 3 is not a physical telescope, but an educational guide in the form of a book ("The Accessible Astrophotography Manual..."). Its role is therefore radically different from the other two products.
Analysis of its description shows it targets a specific audience: complete beginners, seniors, or any new explorer wanting to get started in astrophotography without being overwhelmed by technical jargon. Its supposed strength is to demystify concepts and provide a structured learning path. Based on the general principles of this type of publication, one can expect it to cover topics like equipment selection, basics of image processing, planning sessions, or identifying accessible celestial targets.
The amateur astronomy community often recognizes the value of such guides. They help avoid costly mistakes, save precious time, and maintain motivation when the first technical difficulties arise. A good manual can be the indispensable complement to purchasing a first instrument, whether traditional like the SOLOMARK or smart like the Seestar.
The main limitation is obvious: it is not an observation instrument. Its "potential" depends entirely on the commitment and equipment the user owns or acquires elsewhere. Its relevance is also closely tied to the quality of its content, the clarity of its explanations, and its timeliness – information that can only be fully assessed by consulting detailed reader reviews or excerpts. It addresses a need for knowledge, not a need for optical equipment.
Choosing a Mount: The Key to Stability
This is the truth often learned the hard way: the mount matters more than the optical tube. Frankly, a superb telescope on a poor mount yields blurry images and nights of frustration. Conversely, a robust mount can work wonders even with a modest tube. For astrophotography, it's not just a support; it's a precision engine that compensates for the Earth's rotation for minutes, sometimes hours.
The Motorized Equatorial Mount: Non-Negotiable
For long exposures, it's the only serious option. Unlike an altazimuth mount which moves on two axes, an equatorial mount aligned with the pole star tracks celestial objects with a single, fluid motion. This eliminates field rotation, that scourge which distorts stars into little commas in your images. The built-in motors (referred to as "goto" or motorized tracking) are essential. They not only enable tracking but also allow for automatically pointing to objects, an invaluable comfort when working in complete darkness. A classic mistake? Choosing a mount just at the limit of its load capacity. If the maximum payload is 8 kg, aim for a total tube + camera + accessories weight of around 5-6 kg maximum. Margins are your friends.
Sturdiness and Load Capacity: The Two-Thirds Rule
This is golden advice: systematically under-load your mount. Why? Because the advertised figures are often theoretical, for visual observation. For photography, with wind, micro-vibrations, and long exposure times, a mount at its limit will shake like a leaf. Let's take a concrete example: if your tube weighs 4 kg, your camera and its rotator 2 kg, and the guiding system 1 kg, you're at 7 kg. Don't even look at mounts below a 10-12 kg capacity. It's the smartest investment you can make.
The Newcomers: Harmonic Drives
For a few years now, a technology has gradually been supplanting traditional worm gear drives: the harmonic drive (or "strain wave"). More compact, silent, and requiring almost no maintenance (no backlash to take up, no greasing), it promises remarkable tracking accuracy. Its downside? The price, still quite high. But for those who want a "set and forget" solution and are ready to invest, it's a game-changer in terms of reliability and simplicity. It's less technical know-how to master, and more time for photographing.
Never forget this: your mount is the foundation of your observatory. A beautiful tube on a shaky tripod is like putting a Ferrari engine on a scooter chassis. It won't hold up. Budget for it accordingly.
Opening the Right Doors: Understanding Focal Length and F-ratio
These two figures, often highlighted, literally determine what you will be able to photograph and how difficult it will be. Choosing them at random is sentencing yourself to a battle lost in advance against exposure time or framing.
Focal Length: Your Field of View
Focal length, expressed in millimeters, defines the magnification and the field covered. A short focal length (400-600mm) offers you a wide field, perfect for capturing the majesty of the Orion Nebula or the Milky Way in its entirety. Conversely, a long focal length (1500mm and more) will bring you closer to planetary details or small galaxies.
Let's take a concrete example: with a standard camera sensor (APS-C), a telescope with a 500mm focal length will allow you to frame the entire Orion Nebula with space around it. The same sensor with a 2000mm will only see a very small portion of the center of this nebula. Your choice of target, which we discussed at the beginning, must therefore drive this technical choice.
Focal Ratio (F/D): The Speed of Your Instrument
The F-ratio is the number that follows the 'f/' (like f/4, f/7, f/10). It is probably the most critical parameter for the astrophotographer. It is calculated by dividing the focal length by the diameter of the instrument.
A low F-ratio (between f/2 and f/5) is a fast instrument. To give you an analogy, it's like a very wide open wide-angle lens on a classic camera. It captures a lot of light in a short time. This means shorter exposures to obtain the same level of detail on a faint nebula. It is a major asset for deep sky.
A high F-ratio (f/8 to f/15) gives a narrower field and, above all, a less bright image per unit of time. Perfect for very bright and small objects like planets, where you need detail rather than speed. But for a faint galaxy, at f/10, you will have to expose four to five times longer than at f/5 for an equivalent result. The difference adds up in extra hours, night after night.
To summarize simply:
- Deep Sky (nebulae, galaxies) : Prioritize a low F-ratio (f/4 to f/6). It's a priority.
- Planetary/Lunar : A higher F-ratio (f/10 and above) is acceptable, even beneficial for magnification.
Be careful, there is a trade-off: very fast instruments (f/4 and less) are often more demanding in terms of focusing quality and accessories (like field correctors). But for those focusing on the extended wonders of the sky, it's a game worth the candle. Do not underestimate the impact of this simple number on your enjoyment and success.
Complementary Equipment: What Makes the Difference
Your telescope and mount are the foundation, but it's with the accessories that you go from intention to image. We've all experienced that frustration: a setup that seems good on paper but stumbles on a practical detail. Here is what truly transforms a night of testing into a night of capture.
The Guiding System: Your Autopilot
Essential for deep-sky imaging. Even the best mount in the world has slight drifts. A guiding system compensates for these errors in real-time during the exposure. It typically consists of a small dedicated camera attached to a guide scope, or sometimes directly to the main telescope via an off-axis guider.
Without it, your exposures longer than 60 seconds will likely show elongated stars, even with perfect polar alignment. It's the investment that frees up the most time and reduces frustration the most. You'll finally be able to let the setup work while you have a coffee in shelter.
Focal Reducers/Correctors: The Magic Tool
Did you choose a telescope with a slightly high focal ratio, say f/7 or f/10, for other reasons? A focal reducer can be your savior. This optical accessory screws in front of your camera and does two miraculous things: it shortens the effective focal length (e.g., going from f/10 to f/7) and widens the field of view.
Concretely, this means exposure times are cut in half for the same result on deep-sky objects. It's often a better calculation than buying a completely new telescope. Check compatibility with your specific instrument carefully, as it is not universal.
Filters and Camera: The Artists of Light
The camera is your film. A modified DSLR (to better capture hydrogen-alpha) or a dedicated astronomy camera (monochrome or color) makes a colossal difference. For deep-sky, a cooled camera reduces thermal noise on long exposures.
Filters sculpt the light. In the city, a light pollution filter (UHC or LP type) can save a session by cutting out parasitic lights. For nebulae, narrowband filters (Hydrogen-alpha, Oxygen-III) isolate their specific emissions with stunning efficiency, even under moderately polluted skies. It's like revealing a drawing hidden under a layer of paint.
The Small Details That Paralyze Everything
Don't forget the rest. A poorly secured cable pulling on the tube can ruin the polar alignment. A low-quality extension cord can cut the power in the middle of the night. A portable battery with sufficient capacity (at least 100Ah) is essential in the field. And control and stacking software (like SharpCap, N.I.N.A., or Siril) is the brain that orchestrates it all.
Frankly, you can spend €2000 on an optical tube and mount and ruin it all with €200 of poorly thought-out accessories. Plan this budget accordingly, from the very beginning. These pieces don't make the photo, they simply make it possible.
Budget and Progression: Adapting Your Choice to Your Journey
You don't start landscape photography by buying a €5000 drone and a professional wide-angle lens. It's the same for astrophotography. Your best telescope isn't the most expensive one, but the one that corresponds to your learning phase and your actual patience. Following the right progression means avoiding discouragement and loss-making sales on forums.
First Steps (Budget: €800 - €1500)
Here, we are only talking about the mount. It's counterintuitive, but it's the truth: invest the bulk of your budget in a motorized equatorial mount that is robust and capable of carrying a bit more than your first tube. Why? Because it will be the only element that survives your first year. You can adapt a simple used camera lens or a small 70mm apochromatic refractor to it to start on large nebulae like Orion's. At this stage, the goal is to learn polar alignment, computer control, and basic image processing. An undersized mount condemns you right from this step.
Taking Flight (Budget: €2000 - €4000)
You've mastered the basics, your images are sharp, but you want more detail, more light. It's time to think about a dedicated optical tube assembly. Depending on your targets, the choice revolves around:
- A short apochromatic refractor (f/4 to f/6) of 80-100mm for wide and sharp deep sky.
- A 150-200mm astrograph Newtonian telescope for large aperture at a contained cost. This is also the level where you systematically add an autonomous guiding system and a dedicated astronomy camera. The budget should be divided into three parts: 40% for the mount (which you may already have), 40% for the optical tube, and 20% for critical accessories (guiding, filters).
The Pursuit of Excellence (Budget: €5000 and beyond)
At this level, you no longer change, you optimize and specialize. You are no longer looking for a telescope, but for a coherent setup. We're talking about harmonic drive mounts for their silence and precision, high-end optical tubes like triple apochromats or Ritchey–Chrétien systems. Advanced automation (motorized focus, filter wheel) becomes the norm. Every expense is targeted to solve a specific problem: reducing diffraction, improving contrast, or saving acquisition time.
The Trap to Absolutely Avoid: Skipping Stages
The classic scenario? A beginner buys a large Schmidt-Cassegrain on a lightweight mount because "it's versatile." Result: the mount is undersized, the focal ratio is too long for deep sky, and the complexity of collimation is discouraging. The whole thing ends up in the closet. Frankly, it's better to have superb images of a single type of object with a modest and mastered setup, than a mediocre gallery of a bit of everything with an uncontrollable monster. Progression is the key to lasting enjoyment.
Conclusion
So, there you have it. Choosing the right telescope for astrophotography is not a quest for a mythical object.
It's a series of practical choices, guided by your real desires and your patience. Define your targets, respect your budget, and above all, never underestimate the mount.
Start simple. Progress methodically. The stars aren't going to run away.
They're just waiting for you to be ready. Alright, to your cameras, and clear nights under the stars.
Frequently Asked Questions
What is the best telescope for photographing nebulae?
For deep-sky objects like nebulae, prioritize a telescope with a large aperture (minimum 150mm) and a short focal ratio (f/4 to f/7) to capture the maximum amount of light, and pair it with a robust and ultra-precise equatorial mount.
How to choose a telescope for planetary astrophotography?
For planetary and lunar photography, choose an instrument with a long focal length and a high focal ratio (f/10 or higher) to achieve strong magnification of details, and use the "lucky imaging" technique with a fast camera.
Which mount is essential for deep-sky astrophotography?
A high-precision motorized equatorial mount is essential for long exposures, and it is crucial to underload it by not exceeding two-thirds of its maximum capacity to ensure perfect stability.
What is a good versatile telescope to start astrophotography?
A Schmidt-Cassegrain (f/10) is a good versatile compromise, as it can be adapted with a focal reducer for deep-sky or a Barlow lens for planetary work, but it is a more complex and demanding instrument.
Is a guiding system necessary for astrophotography?
An autonomous guiding system is essential for deep-sky, as it compensates in real-time for the mount's micro-tracking errors and allows for exposures of several minutes without stars trailing.
What is the most important parameter for a telescope dedicated to galaxies and nebulae?
The most critical parameter is a low focal ratio (F/D) (ideally between f/4 and f/6), as it makes the instrument "faster" and significantly reduces the required exposure times to capture these faint objects.
100% free and independent — All our articles are written independently, without any sponsorship. We may earn a commission on purchases made through our links, at no extra cost to you.
Guides you might like

Best Binoculars Value Guide
Find value binoculars that match your real needs. Understand specs like 8x42 and key features for the best observation without overspending.

Best Nature Binoculars Kids
Discover how to choose the perfect first binoculars for a child, focusing on lightweight design, ergonomics, and sparking a love for nature observation.

Best waterproof marine binoculars
Choose waterproof marine binoculars for safety & clarity. Avoid poor optics & nausea. Find gear for all weather.
Articles you might like

Bresser Junior 6x21 Binoculars Review
Discover the ideal first binoculars for kids. Bresser Junior 6x21 offers robust, simple optics to spark a lifelong love for nature exploration.

Adjustable Latitude Equatorial Wedge Review for Telescopes
Precision equatorial wedge for telescopes & astrophotography. Converts photo tripods into stable tracking platforms for celestial photography.

K&F CONCEPT Tripod & Extension Arm Review
Review of K&F CONCEPT tripod with extension arm for versatile smartphone & camera photography and video creation. Our hands-on analysis.