First Telescope Buying Guide for Beginners
Guide
It's time, you have decided to treat yourself to your first telescope. The choice can seem overwhelming with advertisements promising astronomical magnifications. Frankly, don't be fooled: the key to a good start is not there. It is rather about understanding a few fundamental principles so that your first night of observation is a revelation, not a disappointment.
Key Points to Remember
- Prioritize a diameter of at least 100 mm for bright and detailed images, rather than relying on promises of high magnifications.
- Choose a robust and stable mount, as a shaky image ruins observation, especially at high magnification.
- Evaluate the portability of your instrument so it doesn't end up in the closet; a used telescope is always better than an ideal but too bulky telescope.
- Select your type of telescope (refractor or reflector) based on your main targets (planets or deep sky) and your tolerance for maintenance.
- Plan a minimum budget of €250-400 for a serious instrument and include essential accessories like a red flashlight and good sky mapping software.
The Three Decisive Criteria: Diameter, Mount, and Portability
Forget the promises of huge magnifications on the box. For a best beginner telescope for observation, it's a classic trap. The real recipe for not being disappointed boils down to three simple things: an instrument that lets in light, that stays stable when you're looking, and that you actually want to take outside. Let's focus on that.
Diameter: It's the Boss
Also referred to as aperture. This is the most important number on your telescope, expressed in millimeters. Why? It's simple: the wider the tube, the more photons it captures. This translates to brighter, more detailed images with better contrast.
Here's a concrete truth. A small 70 mm diameter telescope will show you Saturn's rings... but they will appear grayish and a bit faint. Move up to a 130 mm or 150 mm model, and then the magic happens: the structure of the rings becomes clear, the planet's color is perceptible. For the Orion Nebula, the difference is even more striking. With a 70 mm, you'll see a small fuzzy patch. With a 130 mm, the characteristic "flame" shape begins to reveal itself.
My advice? Do not go below 100 mm. Frankly, at that price, you risk frustration. A 114 mm or 130 mm is an excellent starting point. It's the best investment to turn simple curiosity into a lasting passion.
The Mount: Stability Above All
What's the use of a beautiful tube if your image shakes like a leaf at the slightest touch? The mount is the base that supports your optics. A bad mount makes observation difficult, even impossible at high magnifications.
There are two main families:
- Azimuth mounts: simple and intuitive. You move the tube up and down (in altitude) and left and right (in azimuth). This is the most common for beginners, especially in the robust form of a Dobsonian mount.
- Equatorial mounts: a bit more complex to set up (they need to be aligned with the pole star), but they then naturally follow the Earth's rotation. Essential if you plan to do astrophotography later.
Regardless of the type, mentally test this: if the mount looks light and wobbly, run away. An image that dances will discourage you in ten minutes. Stability is not a detail, it's half the pleasure.
Portability: The Forgotten (But Crucial) Factor
This is the most personal question. Where will you be observing from? If it's from your stable balcony, weight doesn't matter much. But if you have to load the car, walk a bit, or even just carry the instrument down to the garden, heaviness becomes an enemy.
A heavy, bulky telescope too often ends up in the closet. Be realistic. A 200 mm Dobsonian offers fantastic images, but often weighs over 20 kg and is very bulky. A 100 mm refractor on a light mount transports like a suitcase.
Ask yourself this question before buying: "Will I really have the courage to take it out on a slightly chilly evening?" Sometimes, an instrument that is slightly less impressive on paper, but that you will use twice as often, is actually the best beginner telescope for observation for you.
Refractor or Reflector: Strengths and Compromises of Each Type
This is the great dilemma for beginners. Imagine you have to choose between two cars: a simple and reliable city car, and a powerful but more imposing 4x4. It's a bit like that. The choice isn't made "in the absolute," but based on your playing field and your primary desires.
The Refractor Telescope: Robust Simplicity
This is the classic model, the one we instinctively draw: a long, thin tube, with a lens at the front that collects light. It is by nature a closed and sealed instrument, impervious to dust. A big advantage for maintenance and longevity.
Its strong point? Exceptional contrast for planetary observation. Jupiter and its cloud bands, the Moon's craters, Saturn's rings... details appear sharp and crisp. It's the ideal choice if you live in the city or suburbs, with some light pollution. It is usually delivered complete, ready to use on its mount, which is very convenient.
The compromise? For an equal budget, its diameter (its aperture) will be more modest than a reflector's. You will therefore have less light for deep sky objects. And beyond 100-120 mm in diameter, the tube becomes very long and the mount must be very sturdy, which increases the overall weight and price. Honestly, a small 80 or 90 mm refractor is a fantastic companion for starting gently and observing the classics.
The Reflector Telescope: The Power of Diameter
Here, there is no front lens. A concave mirror at the bottom of the tube collects light and directs it towards a second small mirror, then to the eyepiece on the side. This design allows for a large diameter at a moderate budget.
It's the royal gateway to "deep sky." Galaxies, nebulae, star clusters... these extended and faint objects absolutely need this collected light. A 130 mm or 150 mm Newtonian on a Dobsonian mount will show you things that a refractor twice the price cannot match on these targets.
Where it requires a bit more attention is in maintenance. The tube is open, the mirrors can get dirty or become slightly misaligned (this is collimation). It's not very complicated, but it's an extra step. And its bulk is often greater: the tube is wide and short, but the Dobsonian mount, although stable, takes up space.
So, Which One for You?
Ask yourself these two questions. "Do I first dream of the Moon and planets, or distant galaxies?" And "Am I willing to learn a minimum of maintenance to gain power?"
If the answer to the first is "the planets" and to the second "no," a refractor is an excellent best beginner telescope for observation. If it's "deep sky" and "yes, no problem," then a reflector on a Dobsonian mount is clearly the path to performance. There is no wrong choice, only a different path to the stars.
Our Selection
Our selection of the day revolves around a common passion: astronomy and sky observation. We have chosen to present you with a complementary trio, ranging from practical instruments to theoretical knowledge, to accompany your first steps under the stars. Whether you are a parent wanting to introduce a child, or an adult curious to discover this hobby, this selection analyzes tools designed for beginners.
| Product | Type | Target Audience | Key Strengths | Format / Main Features |
|---|---|---|---|---|
| CFEN Beginner Telescope R50360 | Refractor Telescope | Beginners & Families | Complete kit, ease of use, versatility | 50mm Aperture, 18X-180X Zoom, altazimuth mount |
| COMMENT UTILISER UN TÉLESCOPE | Practical guide | Motivated Beginners | Structured pedagogy, step-by-step approach | 7 lessons, covers selection, setup and observation |
| 110 Trésors de l'Espace | Fun observation guide | Children & young teenagers | Playful approach, catalogue of celestial objects | 110 objects to observe, focus on planets & constellations |
CFEN Beginner Telescope R50360
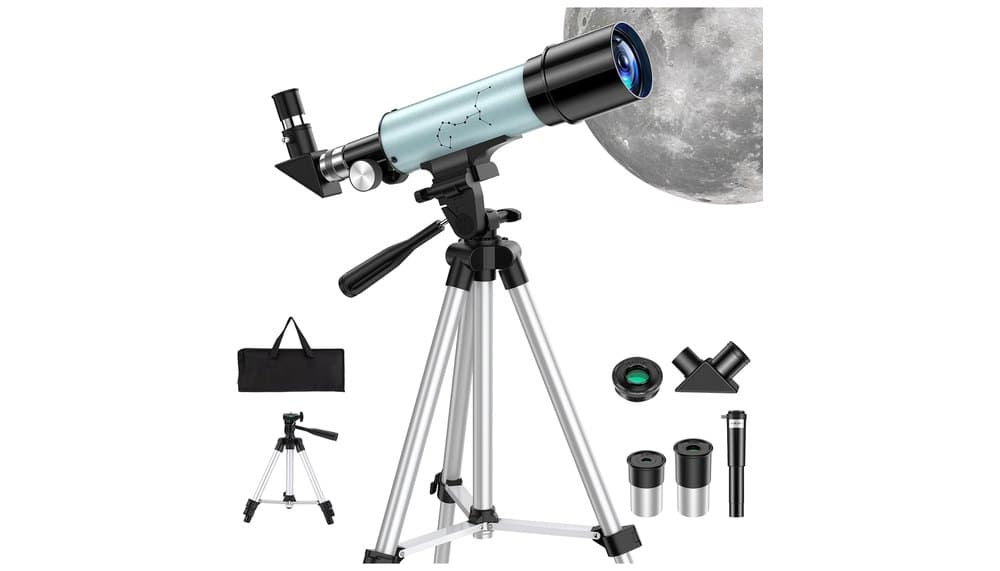
This refractor telescope is presented as an all-in-one starter kit. On paper, its specifications indicate a 50 mm aperture and a 360 mm focal length, which, theoretically, allows access to magnifications from 18x to 180x with the supplied eyepieces and Barlow lens. The altazimuth mount is known for its simplicity, and the adjustable-height tripod promises use for the whole family.
Based on user feedback, the strengths of this model are its quick learning curve. The community notes that it is indeed very simple to assemble, which is a major asset for a first instrument. Many also highlight its versatility: it allows for decent observations of the Moon (especially with the included lunar filter) and can be used for terrestrial observation (landscapes, birds). Its light weight (less than 1 kg) makes it a portable telescope, suitable for a camping trip or in the garden.
However, reviews highlight significant limitations, especially for anyone expecting spectacular images of planets or nebulae. The optical quality is described as basic. At high magnifications (close to the advertised 180x), the image often becomes blurry and lacks contrast, which is consistent with entry-level optics. The other critical point concerns stability. The tripod, while practical, is considered too light and sensitive to vibrations, making fine adjustments difficult, especially in a light breeze. In summary, it is an instrument that fulfills its role as a "passion starter" for a first sky experience, but whose expectations for advanced astronomical performance must be moderated.
Important caveat: with its 50 mm aperture, this telescope falls below the 100 mm minimum we recommend above. Consider it a discovery tool to confirm your interest before investing in a more capable instrument.
COMMENT UTILISER UN TÉLESCOPE
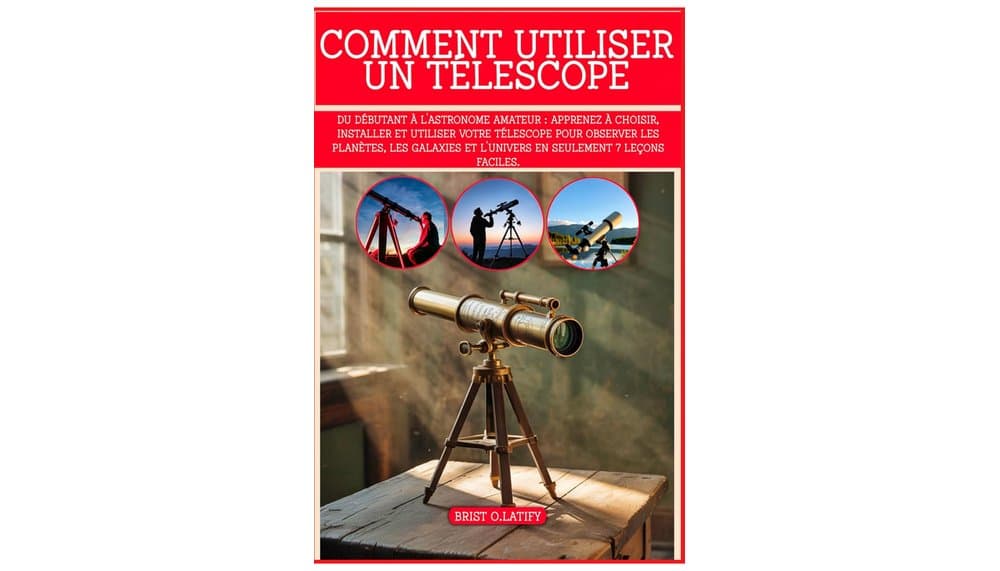
This guide positions itself as a manual to transform a complete novice into an autonomous amateur astronomer. Its promise is clear: learn to choose, set up, and use your telescope in just 7 easy lessons. Its structured approach is its main selling point, promising to go beyond a simple user manual to provide real keys to understanding.
Analysis of community feedback indicates that this book fills a real need. Beginners who have consulted it appreciate its progressive pedagogy which demystifies technical jargon. Reviews highlight that the chapters on choosing a telescope and aligning the mount (a common stumbling block) are particularly useful. It seems to provide a solid theoretical foundation on how instruments work and observation techniques, which the hardware alone cannot provide.
The limitations mentioned by readers are mainly related to format and content. As a pocket-sized book, it contains no color images or diagrams, which can make some explanations less intuitive for a subject as visual as astronomy. Furthermore, some feedback notes that, despite its title, part of the content remains quite theoretical and requires active practice from the reader. It is therefore not a "magic" book, but rather a learning companion that requires motivation. It is ideal for someone who wants to understand what they are doing before looking through the eyepiece.
110 Trésors de l'Espace
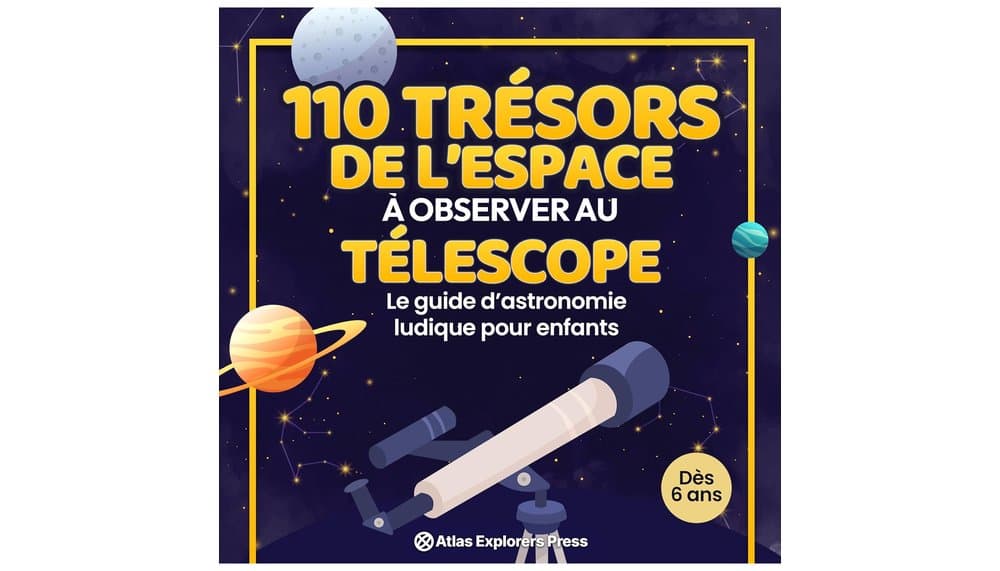
This digital book presents itself as a fun astronomy guide specifically designed for children. Its goal is to serve as a treasure map for the sky, listing 110 celestial objects to discover with a telescope, from planets to distant galaxies and constellations.
Analysis of customer reviews reveals that its main strength is its engaging approach for young people. By focusing on a catalogue of objects to "check off," it turns observation into a treasure hunt, maintaining motivation and curiosity. Parents note that the language is suitable and that the selection of objects seems realistic for observation with a small beginner's instrument, like the CFEN presented above. It is an excellent tool to give meaning and direction to the first observation sessions.
However, the community points out some constraints. The "Print Replica" Kindle format means it is essentially a digital copy of a paper book. This can limit interactivity and reading comfort on some e-readers and prevents smooth adjustment of text size. Its content is also very targeted: it is a catalogue of objects with simple explanations, and not a technical manual. It will not teach you how to adjust your telescope. Its utility is therefore maximized when paired with an instrument and, possibly, a more technical guide for parents. It excels in its role: inspiring and guiding children's first looks at the sky.
Choosing Based on Your Targets: Moon, Planets, or Deep Sky
This is the heart of the matter. Your instrument choice should serve your dream, not the other way around. You wouldn't go duck hunting with a butterfly net; the same logic applies. Your first targets determine the technical priorities.
For the Moon and Planets: Precision Above All
Here, it's not the quantity of light that matters, but the quality. The Moon, Jupiter, Saturn, or Venus are small, bright objects full of subtle details. You aim to see Jupiter's cloud bands, the division in Saturn's rings, the elongated shadows in lunar craters.
The key is contrast and the ability to handle high, stable magnification. You want an instrument that provides a sharp image without halos or stray light. A refractor is often cited for this, but a small, well-adjusted (collimated) reflector will also do the job. The critical element, as we've seen, is truly the mount. A two-second vibration at 200x magnification and you lose all the detail. Frankly, an 80 mm telescope on an ultra-stable mount will provide more magical moments than a 150 mm that shakes like a leaf. Also plan for a neutral density Moon filter: observing the full Moon without one is dazzling and unpleasant.
For Deep Sky: The Race for Light
Here, everything changes. Your targets? The Orion Nebula (a giant patch of gas), the Andromeda Galaxy (an island universe 2.5 million light-years away), star clusters like the Pleiades. These objects are immense in the sky, but incredibly faint. They don't shine; they leak light.
Your only ally is aperture. The wider the mirror or lens, the more photons it captures. This is non-negotiable. This is why 200 mm Dobsonian telescopes are so popular: they offer the best aperture/price ratio. For equal aperture, a reflector is generally more affordable than a refractor, making it more interesting for this mission. Forget high magnifications; you'll often use eyepieces that provide a wide, bright field of view. And be aware: from a city balcony, even with a large aperture, these objects will remain pale. For deep sky, a countryside site with a dark sky is the first and best accessory.
A Third Way: The Versatile Swiss Army Knife
You don't want to choose? That's understandable. Most beginners want a bit of everything, and it's possible. You must then aim for the right balance. An instrument in the 130 mm to 150 mm aperture range offers a good compromise. It will show you Saturn's rings with suitable eyepieces and will already reveal the brightest deep-sky gems like the Orion Nebula or the Hercules Cluster. It's often in this category that you find the best beginner observation telescope for someone who wants to explore without specializing immediately. Be realistic: it won't be the best in every field, but it will be good everywhere, which is a fantastic engine for curiosity.
Establish a Coherent Budget and Avoid False Bargains
Let's talk money, straight up. Your budget is the most realistic filter for making a good choice. There is a fundamental difference between an optical toy and a serious instrument, and it starts around 250-300 €. Below that, you risk mostly frustration.
The Danger Zone: Too-Good-to-Be-True Promises
Beware like the plague of ads promoting "500X MAGNIFICATION!" for a 60 mm tube under 150 €. This is the classic trap. That magnification is theoretical, completely useless, and will yield a dark and blurry image. Often, the lightweight plastic mount shakes at the slightest touch. These purchases end up in the closet after two uses and kill budding passions. Frankly, at that price, a good pair of 10x50 binoculars is a much better investment for discovering the sky.
Sensible Price Ranges
Here is what you can reasonably expect, assuming you are buying a new and complete instrument (tube, mount, basic eyepieces).
- For a tight budget (250€ - 400€): This is the entry-level for serious gear. Here, you find short refractors of 70 to 90 mm on a decent alt-azimuth mount, or – and this is often a much better choice – reflectors like a 130 mm to 150 mm Dobsonian. This Dobsonian will be almost too performant for its price, offering real aperture for exploring. This range is often where the search for the best beginner telescope on a limited budget happens.
- The ideal beginner budget (400€ - 700€): This is the comfort zone. For around 500 €, a 200 mm Dobsonian becomes accessible. It's a true deep-sky exploration machine, stable and simple. In this range, you can also consider basic motorized equatorial mounts, useful if the idea of manually tracking an object puts you off. The general quality of components (eyepieces, finder) is better.
- Beyond (700€ and up): You are paying for refinements: more precise motorization and alignment (goto), very high-quality optics (like ED/HD for refractors), or even larger aperture. This is excellent, but not essential for an exciting first purchase.
Don't Forget the "Hidden Budget"
The instrument is just the beginning. Add a few quasi-essential items to your financial plan:
- A good sky atlas or a smartphone app (free or paid) to guide you. It's your road map.
- A moon filter. For 20-30€, it transforms lunar observation into a comfortable experience.
- Possibly, a supplementary eyepiece. The one provided (often a 25mm or 10mm) is a good start, but a quality eyepiece offering a wide field (like a 32mm Plössl) or magnification better suited to your targets (e.g., 6mm for planets) changes everything. Budget 50 to 100€ for a good entry-level model.
One last piece of friendly advice: if your budget is very tight, look to the used market. The amateur astronomy community regularly updates its equipment. You can often find well-maintained 150mm or 200mm Dobsons at very attractive prices. Just check the mirrors (for absence of spots, oxidation) and the smoothness of the movements. This is often the real bargain.
The Accessories That Make a Difference and Basic Maintenance
Your telescope is here. Great. But it's a bit like a car: what happens around it really changes the experience. Let's go over the little extras that will save you nights of struggle and protect your investment.
The Essentials for Carefree Observing
Forget about observing with just an eyepiece. You need a good source of information and comfort.
- A red-light flashlight. This is non-negotiable. White light destroys your night vision for 20 minutes. A small headlamp with a red mode (or covered with red cellophane paper) allows you to read your charts, adjust your mount, without blinding yourself or your observing companions. Honestly, without this, you are in complete darkness, literally.
- An adjustable-height folding seat. Observing while standing, hunched over, is torture for your back. A small fishing stool or observer's chair allows you to sit comfortably at the right height for the eyepiece. It's a game-changer for long sessions.
- Software or a star atlas book. Your telescope alone doesn't know where to look. Download Stellarium (free on PC/smartphone) or get an atlas like "Guide du Ciel" by Guillaume Cannat. These are your celestial GPS for identifying what you see and planning your evenings.
Improving the View: Eyepieces and Filters
The supplied eyepieces do the job, but this is where you can really refine your experience. Don't rush, observe first with the basic equipment to understand your needs.
- The Wide-Field Eyepiece. If your basic eyepiece is a standard Plössl (often 52° field of view), replacing it with a wide-field model (68° or more) like a 32mm Plössl or a 24mm 68° gives you a more immersive, easier view for locating objects. It's the first smart upgrade.
- The Neutral Density Moon Filter. The Full Moon is so bright it's uncomfortable and masks details. An ND (Neutral Density) gray filter that screws onto the eyepiece, for about 30€, reduces glare and improves crater contrast. Simple and effective.
- The Narrowband Filter (UHC/Nebula type). More specialized and more expensive (100€+), but if nebulae fascinate you, it's magic. It isolates the specific light from these objects, rejecting light pollution. The result? A nebula like Orion goes from ghostly to visibly detailed. Buy this later, when your passion for deep sky is confirmed.
Protecting Your Instrument: Maintenance in Three Rules
A well-treated telescope lasts for decades. The rules are simple but absolute.
- Enemy number one: Condensation. Never, ever, do you pack your telescope away immediately after observing. Bring the tube inside and leave it without its caps in a dry room (not a damp basement!) until all traces of dew have disappeared. A tube filled with moisture is a breeding ground for fungus that eats away at optical coatings. For transport, silica gel packets in the box or case are valuable allies.
- Clean as little as possible. Seriously. A little dust on the lens or mirror has a negligible impact on the image. A clumsy cleaning, on the other hand, will scratch it permanently. For dust, use only a soft photographic blower bulb. If a fingerprint or stubborn dirt spot persists, then and only then, with extreme caution, use a specific fluid for optics and new microfiber cloths, using very light movements from the center to the edge.
- Protect it from shocks and the sun. The mount, especially if it's equatorial, is vulnerable to falls. Transport the tube and tripod separately. And most importantly, never let sunlight enter the tube without the specific, dedicated solar filter that screws onto the front of the instrument. Looking at the sun through an eyepiece, even for a fraction of a second, burns the retina irreversibly and can melt internal parts. This is the only absolute safety rule.
Conclusion
So, there you have it. Choosing your first telescope is no longer a mystery. Forget promises of fanciful magnification and focus on the essentials: a good aperture, a stable mount, and genuine reflection on what you want to see.
Get started. The best setup is the one that will make you want to take it out and observe, again and again. That's how simple curiosity turns into a passion.
The sky awaits. Clear skies and happy observing!
Frequently Asked Questions
What is the best telescope for beginners?
The best telescope for beginners is one that combines an aperture of at least 100 mm, a stable mount, and portability suited to your use. A 130 to 150 mm reflector on a Dobsonian mount often offers the best compromise between power, stability, and price for a first purchase.
What type of telescope is the simplest for a beginner?
A 70 to 90 mm refractor telescope is often the simplest for beginners, as it is typically ready to use, requires little maintenance, and offers good contrast for the Moon and planets. Its closed design also protects it from dust.
Which telescope should I choose to observe the planets?
To observe the planets, favor an instrument that offers good contrast and a stable image at high magnification, such as a well-adjusted refractor or reflector on a robust mount. The stability of the mount is as crucial as the quality of the optics for discerning details.
What budget should I plan for a first serious telescope?
You should plan a minimum budget of 250 to 400 € for a first serious telescope, which avoids toy models with unstable mounts. In this range, you can find excellent 130 mm to 150 mm Dobsonian-type reflector telescopes.
Should I favor aperture or magnification?
You should absolutely favor aperture (the diameter) over the advertised magnification, because a large diameter captures more light for brighter and more detailed images. Promises of high magnification on small tubes are a trap leading to dark and blurry images.
Which accessory is indispensable for observing with a telescope?
A red-light flashlight is an indispensable accessory for preserving your night vision during observation. An adjustable folding seat and sky mapping software like Stellarium are also highly recommended for comfort and discovery.
100% free and independent — All our articles are written independently, without any sponsorship. We may earn a commission on purchases made through our links, at no extra cost to you.
Guides you might like

Astrophotography Telescope Buying Guide
Choose the right telescope for astrophotography to avoid frustration. Key factors depend on your target nebula or object.

Best Binoculars Value Guide
Find value binoculars that match your real needs. Understand specs like 8x42 and key features for the best observation without overspending.

Best Nature Binoculars Kids
Discover how to choose the perfect first binoculars for a child, focusing on lightweight design, ergonomics, and sparking a love for nature observation.
Articles you might like

BOSSDUN GN0039 Telescope: In-Depth Testing & Review
BOSSDUN GN0039 telescope review: 80mm scope with 25-75x zoom, tripod & phone adapter for birding, hunting & astronomy. Entry-level analysis.

usogood TC30V6 Trail Camera Review & Test
The usogood TC30V6 trail camera is a reliable, entry-level model for capturing wildlife in detail, day or night. Perfect for amateur naturalists.

Bresser Junior 6x21 Binoculars Review
Discover the ideal first binoculars for kids. Bresser Junior 6x21 offers robust, simple optics to spark a lifelong love for nature exploration.